Posts

Tip #1703 – Transferring a Portion of One Sales Rep Territory to Another Sales Rep

dynaMACS makes it easy when you are changing your agency territories.  Instead of moving one customer at a time, dynaMACS can move multiple customers at one time.

In the following example we will transfer all of sales rep Jim Black’s accounts in the state of Kentucky to the new sales rep Rick White.

Customer Global Update

First you must run the Customer Global Update.

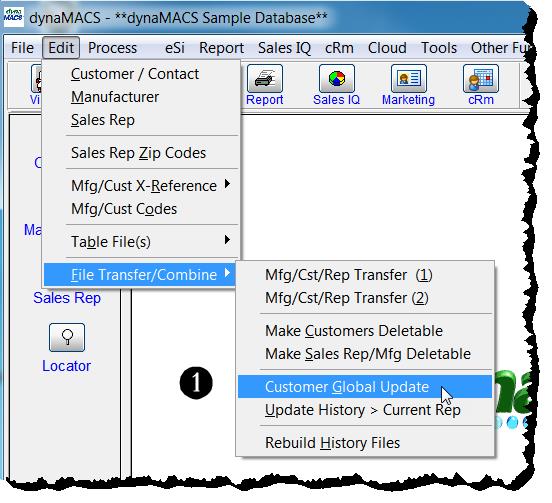
  1.  From the main dynaMACS screen select Edit>File Transfer/Combine>Customer Global Update.
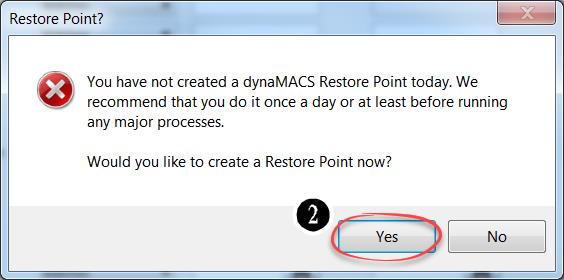
  2. Select the Yes button from the Restore Point? dialog box to create a restore point.
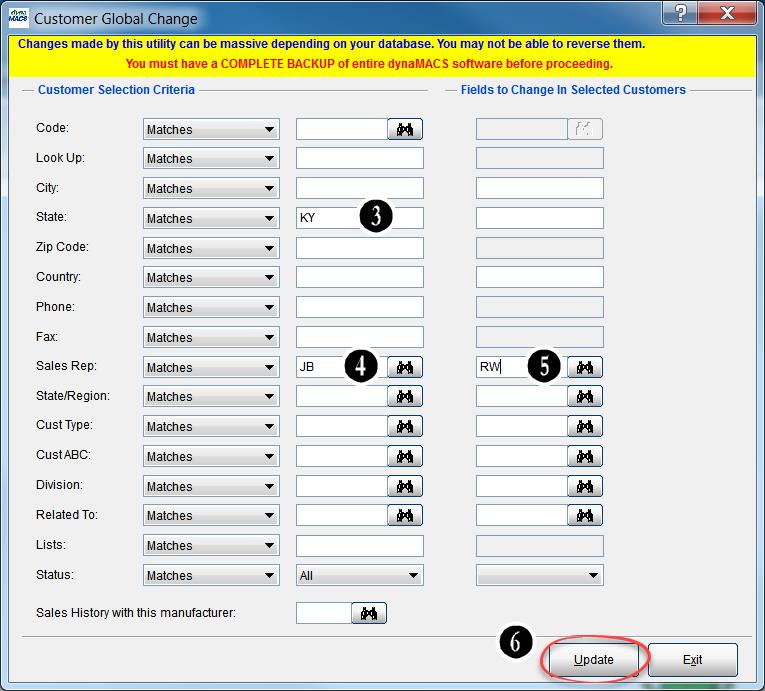
  3. In the Customer Global Change screen enter the state code “KY” in the State field.
  4. Enter the “from” sales rep code “JB in the Sales Rep field (old rep).
  5. Enter the “to” sales rep code “RW” in the next Sales Rep field to the right (new rep).
  6. Select the Update button.
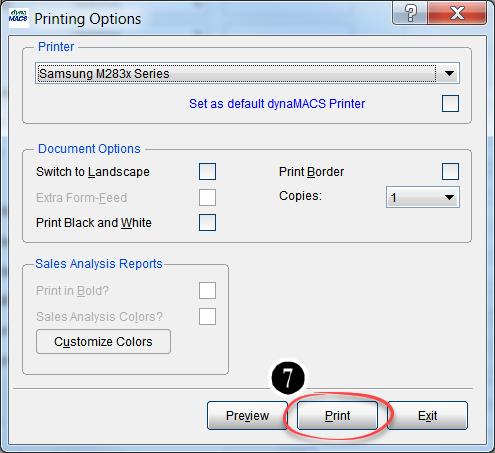
  7. Select the Print button from the Printing Options dialog box to print the Audit Trail report.
  8. This report shows a list of the customers that will be transferred from sales rep “JB” (Jim Black) to sales rep “RW” (Rick White).
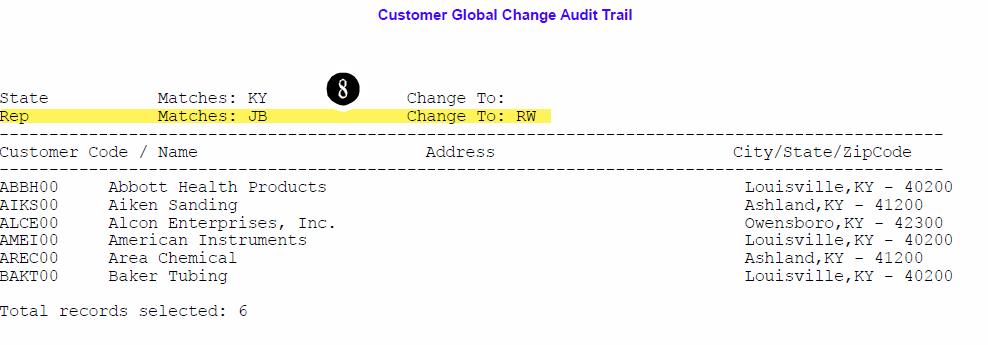
  9. After reviewing the Audit Report select the Yes button to continue.

    Transfer Sales and Commission History to New Rep

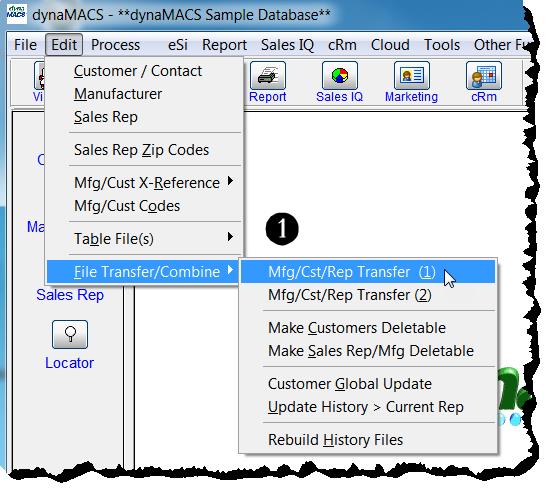
    1.  From the main dynaMACS screen select Edit>File Transfer/Combine>Mfg/Cst/Rep Transfer (1).
    2.  From the Manufacturer/Customer/Sales Rep Transfer/Combine (1) screen select the Wizard button at the bottom right hand corner which will redirect you to the Wizard screen.  You will be prompted to create another Restore Point.
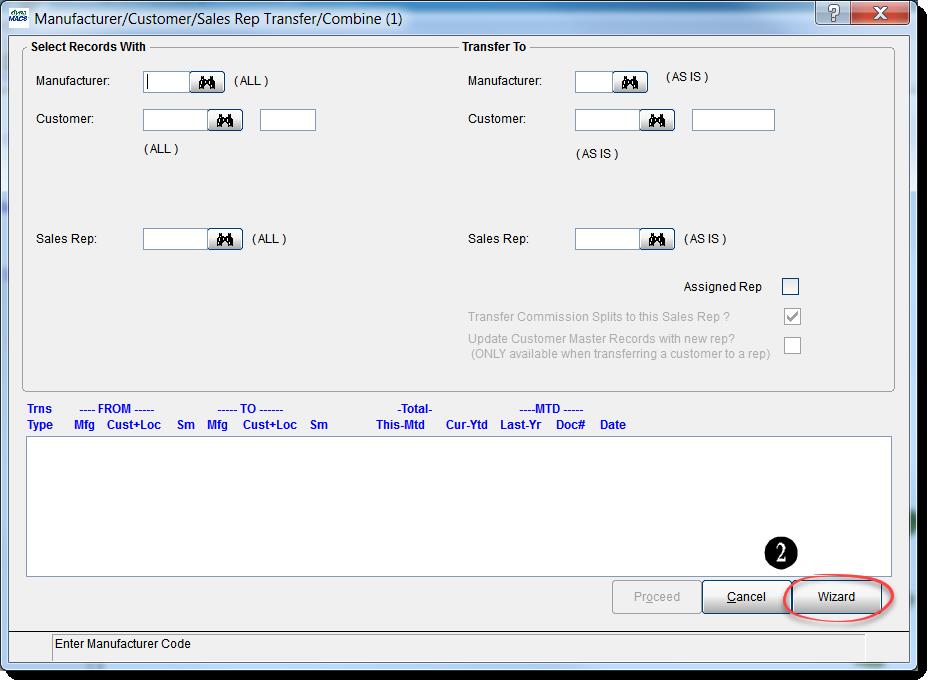
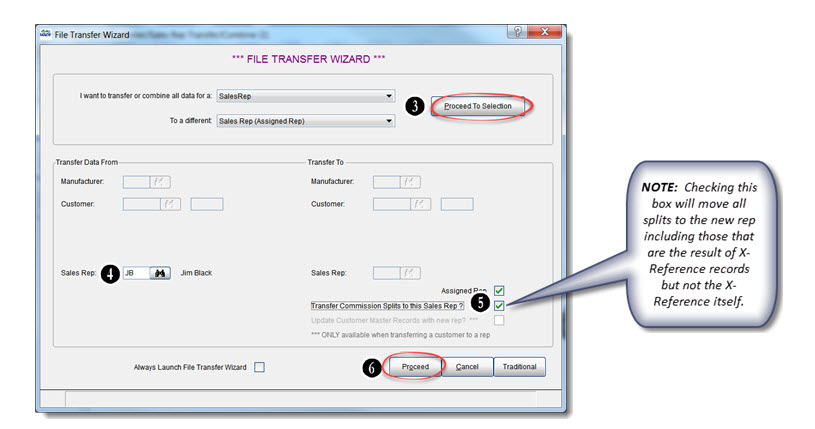
    3.  Select Sales Rep from the drop down list for the field: I want to transfer or combine all data for a:.  Select Sales Rep and for the field: To a different.  Then select the Proceed to Selection button.
    4.  Enter the Sales Rep code that you are transferring from under Transfer Data From i.e. “JB”.
    5.  If you wish to transfer the sales rep splits, check the box Transfer Commission Splits to this Sales Rep?
    6.  Select the Proceed button.
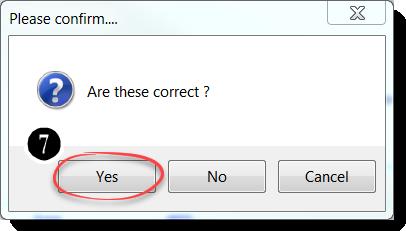
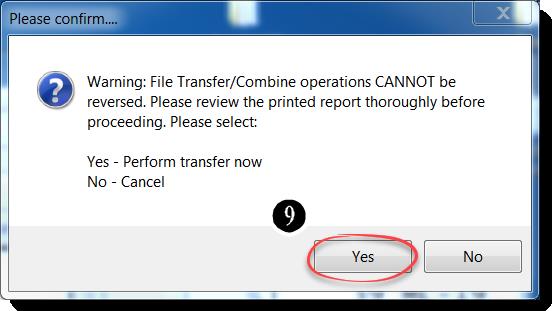
    7.  Select the Yes button on the Please Confirm dialog box.
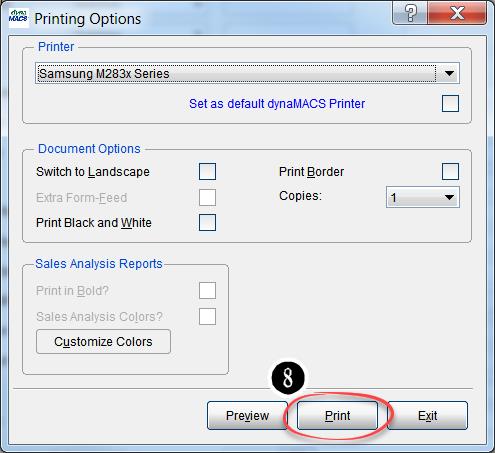
    8.  From the Printing Options screen select your printer and then select the Print button.
    9.  Review the report and then select the Yes button to complete the transfer.
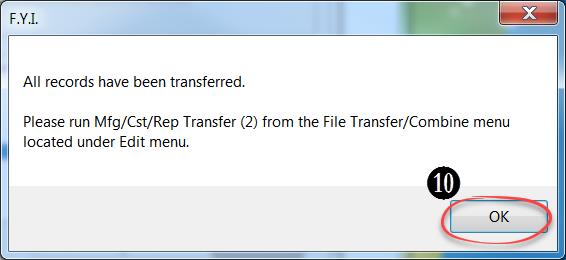
    10.  Select the OK button after all records have been transferred.
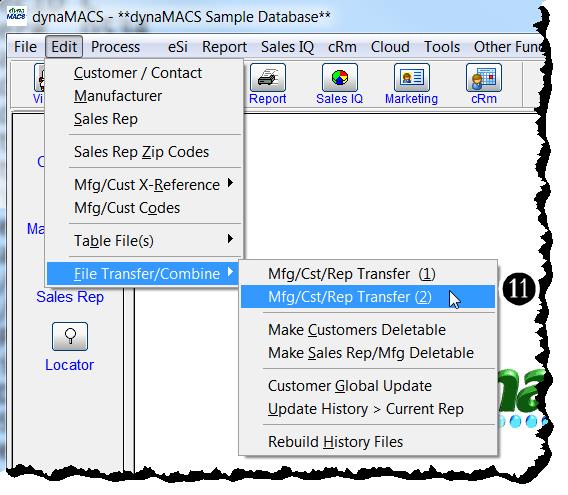
    11.  From the main dynaMACS screen select Edit>File Transfer/Combine>Mfg/Cst/Rep Transfer (2).
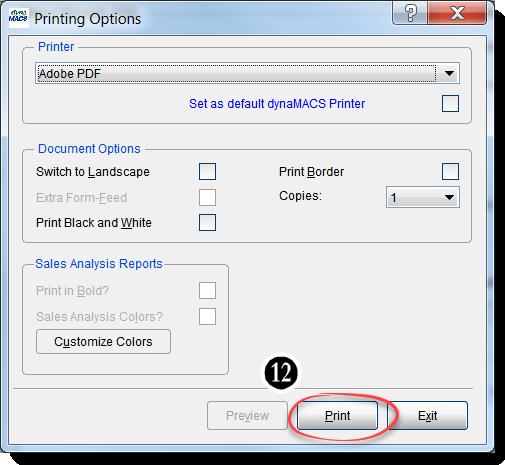
    12.  Print the report when prompted by selecting the Print button.
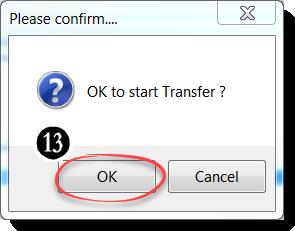
    13.  Select the OK button on the Please Confirm dialog box to complete the transfer.
Tip #1702 – Organizing Your Agency Workflow to Accommodate all the Various Manufacturers

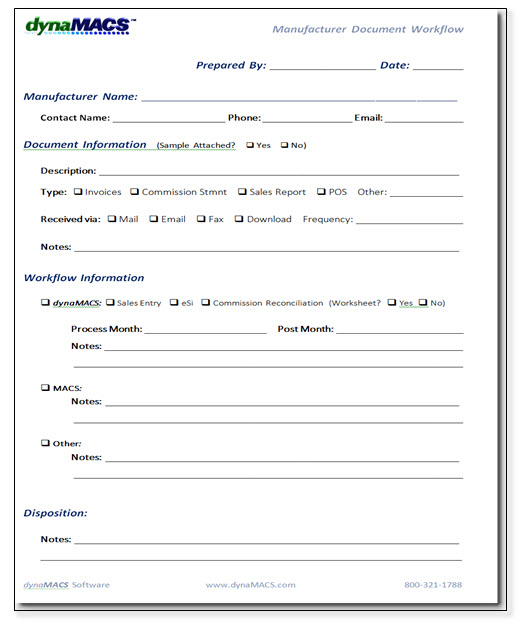
One of the many challenges sales agencies face is dealing with the many forms and documents received from each of the manufacturers that the agency represents. Whether a document gets entered into dynaMACS, QuickBooks or just filed, it is helpful to document the process for each unique manufacturer document received.  We suggest that you create a binder with a tab for each manufacturer and use the form below (or something similar) for each document.

Create a Binder

  1. Set up a binder with a tab for each manufacturer.
  2. Behind each tab you should have the dynaMACS Manufacturer Document Workflow Worksheet (example below) and examples of all other documents you receive from the manufacturer.
    Example:
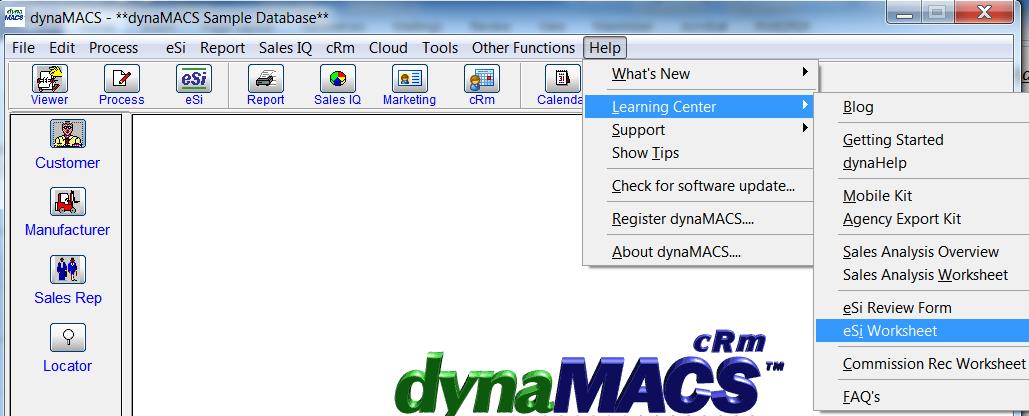
    To obtain copies of this worksheet and all other dynaMACS worksheets go to Help>Learning Center from the dynaMACS Main Screen.  You will also find them in the dynaMACS Implementation Kit that you receive upon purchasing your software.

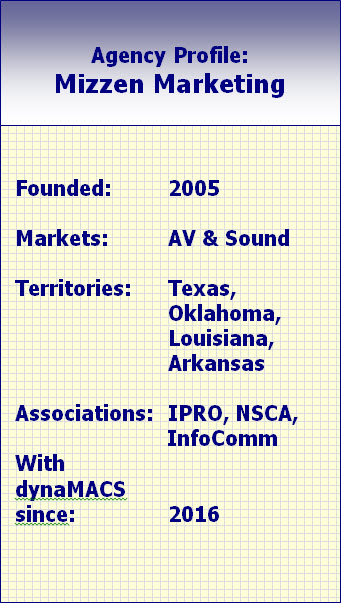
Case Study: Mizzen Marketing

 “dynaMACS is an empowering tool for understanding sales and analyzing trends.”

Lisa Ortega, Operations Manager
Mizzen Marketing

Client Challenge

When it came to tracking sales and commissions, Mizzen Marketing had two primary issues: accuracy and visibility. The agency had used two different tools. With Excel, the agency noticed inaccurate sales numbers, likely due to accidental deletions. Over time, the file grew to a monster of a spreadsheet that was difficult to use and extract data from. Quickbooks provided a more accurate representation of the numbers, but data was only visible in basic reports and was stored on an accounting firm’s system, so Mizzen had to wait for information. Lisa Ortega, Mizzen Marketing’s Operations Manager, knew there must be a better way. “I mentioned to a colleague that I wanted software designed specially for sales agencies. He told me about dynaMACS.”

dynaMACS Solution

From the beginning, it was a smooth transition. “dynaMACS offered the best features minus the headaches. dynaMACS aligned perfectly with how we wanted to track sales and commissions,” Ortega says.

In the audiovisual space, many manufacturers sell products through distribution channels, so Mizzen Marketing must be able to track the distributors’ performance as well as the sales of the customers buying from them. With dynaMACS, the agency creates unique “Manufacturer/ Distributor” codes so they can easily evaluate the manufacturer as a whole or by individual distributor. We can also see the buying trends of the customers – who they buy from and at what volume.”

Because Mizzen Marketing can see trends, the agency is able to be proactive. “It’s insightful on so many levels,” Ortega says. “Everything we need is right at our fingertips.” Even the sales reps in the field have easy access and can pull up data on their laptops before going into a sales meeting.

Ortega calls dynaMACS an “empowering tool for understanding sales and tracking.”

Tip #1701 – Using the dynaMACS System Information Setup Screen to Pre-Select Reporting Options

In dynaMACS you can set defaults for some of the reporting options which will save you time by eliminating the need to set them each time you run a report.

  • You can choose to build State/Region codes on the fly when running a Sales Analysis report if they are missing from the customer record.  This feature will combine the State Code plus the first 3 digits of the zip code from the customer address.
  • When running Sales Analysis reports you can choose to automatically skip to a new page for select codes if the Customer ABC code contains any one of the pre-selected codes.
  • Print Sales Analysis reports sorted alphabetically by the Look-Up code rather than Customer code.
  • Set Agency Commission printing options to Print Always, Never, or Prompt the user.
  • Set default to turn off automatic page skipping on all general reports.

Access Reporting Options

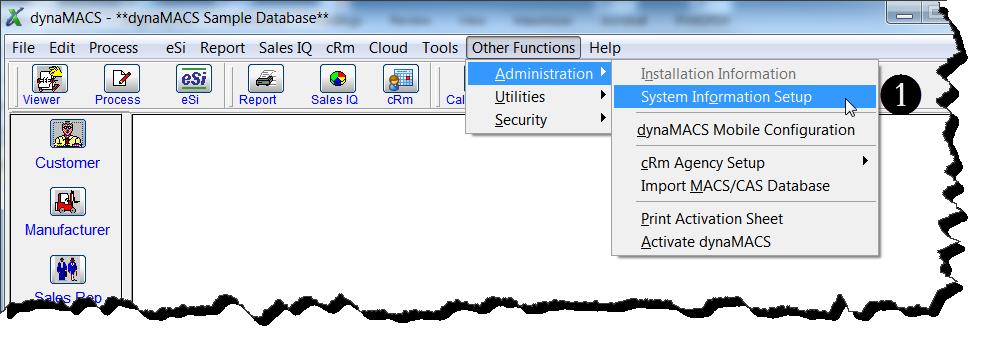
  1. From the dynaMACS main screen select Other Functions> Administration>System Information Setup. 
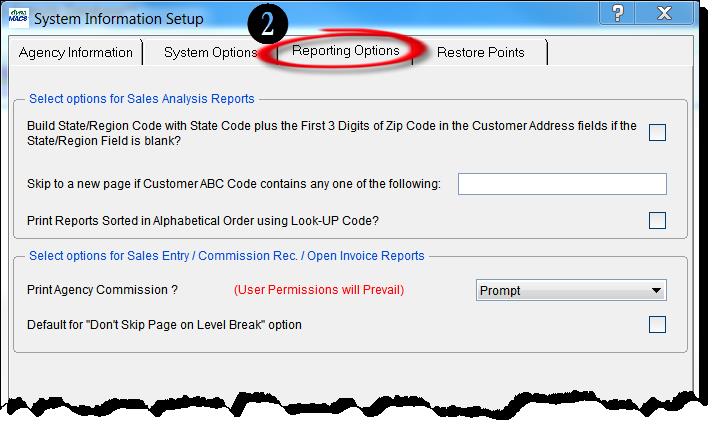
  2. Select the Reporting Options tab from the System Information Setup screen.

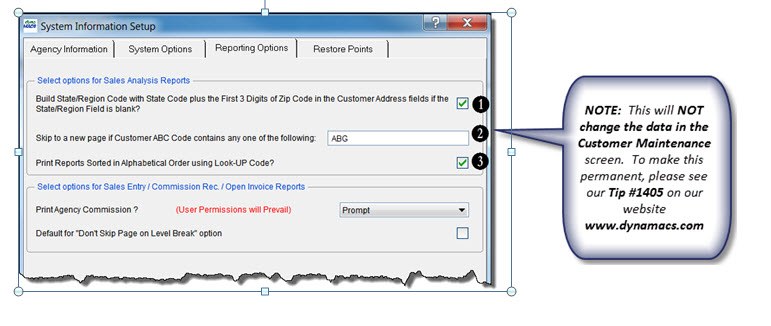
Select Options for Sales Analysis Reports

  1. To build the State/Region code “on the fly” in Sales Analysis reports, select the checkbox.
  2. To set Page Skipping for customers with the pre-selected ABC codes, enter the ABC code here.
  3. To print Sales Analysis reports sorted in alphabetical order using the Look-Up code rather than the Customer code, select the checkbox.

Select Options for Sales Entry/Commission Reconciliation/Open Invoice reports

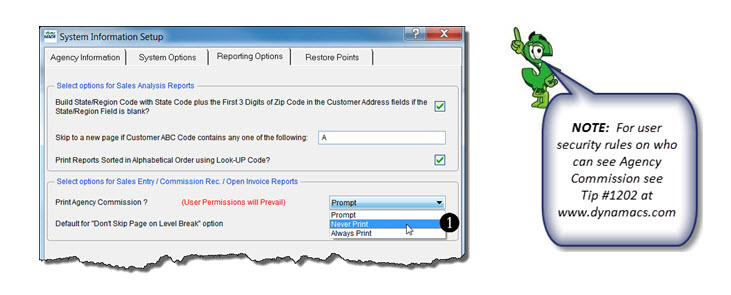
  1. Select your preference for Printing Agency Commission from the drop down box.
    • Prompt will prompt the user to print Agency Commission for users that can see commissions.
    • Never Print will set the default so Agency Commission will never print for all users.
    • Always Print will set the default so Agency Commission will always print for users that can see Agency Commissions.
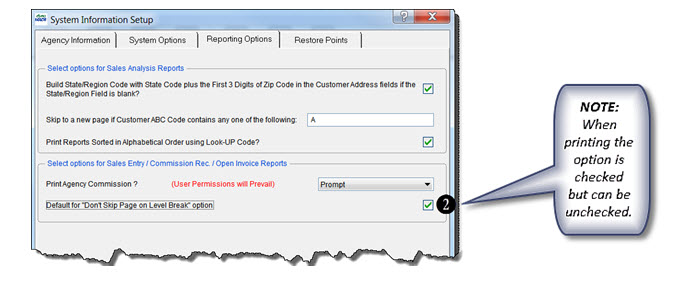
  2. To disable automatic page skipping, check the box next to “Default for Don’t Skip Page on Level Break”.
  3. After all of your Reporting Options have been selected, click on the Save button.

Tip #1612 – Using the dynaMACS System Information Setup Screen to Set the Frequency and Warning Messages for Restore Points

Restore points in dynaMACS are important when performing some functions such as posting sessions or doing transfers. (Please see Tip #1308 on the importance of creating a restore point.)  In dynaMACS you can control when your Restore Points are required or set a warning when the Restore Point SHOULD be done.  The following tip will walk you through setting this up.

Setting the Restore Point Frequency/Warning Message

  1. From the main dynaMACS screen select Other Functions>Administration>System Information Setup.
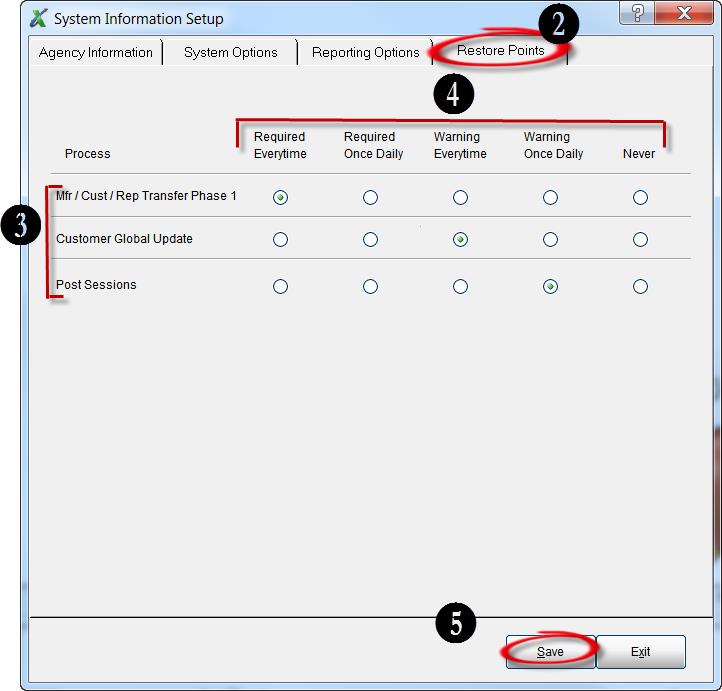
  2. Select the Restore Points tab at the top of the System Information Setup screen.
  3. There are three processes for which you can setup warnings or required defaults.
  4. Select the appropriate radio button.
    • Required Everytime will force the user to create a restore point each time this process is run.
    • Required Once Daily will force the user to create a restore point the first time this process is run each day.
    • Warning Everytime will display a warning to create a restore point each time this process is run.
    • Warning Once Daily will display a warning to create a restore point the first time this process is run each day.
    • Never will not show a warning or force a restore point when this process is run.

5.   Once your selections have been made click on the Save button.

Tip #1610 – Understanding the Symbols and Codes on a dynaMACS Sales Analysis Report

When reviewing your dynaMACS Sales Analysis reports there are two symbols to look for that will easily identify customers with first time sales as well as customers with no sales in 3+ months.  There are also codes that are displayed to help you identify Column Settings and Sub Totals that where selected for this report as well as filters that may have been used.

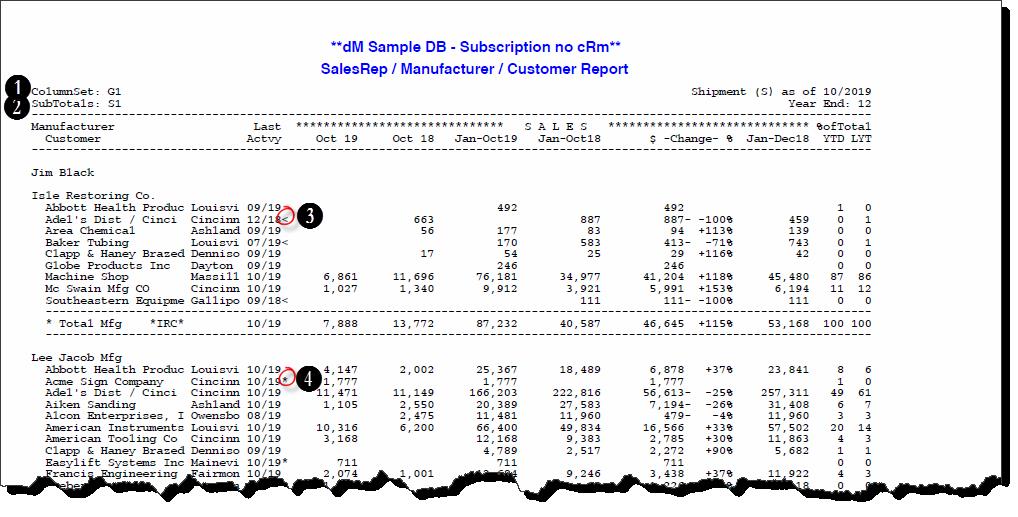
  1.  The Column Set displays the Column Set that was chosen when creating the report.  In the following example G1 was selected.
  2.  The Subtotals displays the Subtotals Code that was selected when creating this reportIn the following example S1 was selected.
  3. Customers that have a Less-Than (<) sign to the right of the Last Activity date are those that have no sales in 3 months or longer.
  4. Customers that have an Asterisk (*) to the right of the Last Activity date are first time buyers.report-screen-1
  5. The Filter field at the bottom left hand corner of the report will display all of the filter    selections chosen when creating this report.  In this example we have selected Mfg Code IRC thru MNC, Rep Code is JB and Cust Type A thru Z.report-screen-2