Posts

Tip #1301 – Power of eSi Mapping

If you receive sales information from manufacturers electronically, you can replace hours of data entry by importing that information directly into dynaMACS using the optional Electronic Sales Input (eSi) module. eSi includes the Reformat Utility which translates the information from your manufacturer into a file that dynaMACS recognizes. Once you have shown dynaMACS how to translate a manufacturer’s file the first time, dynaMACS remembers the translation, or map, for any future sales information files received from that manufacturer. Below are just a couple of eSi features that show the power of eSi mapping.

Auto Duplicate Feature

The Advanced feature #11 says Auto Duplicate any fields in the import file if the row is blank. This will apply to all dynaMACS fields in Column 3 that have an “*” next to them.

Electronic Sales Information Mapping with the auto duplication field checked for importing manufacturer commission statements into dynaMACS Software

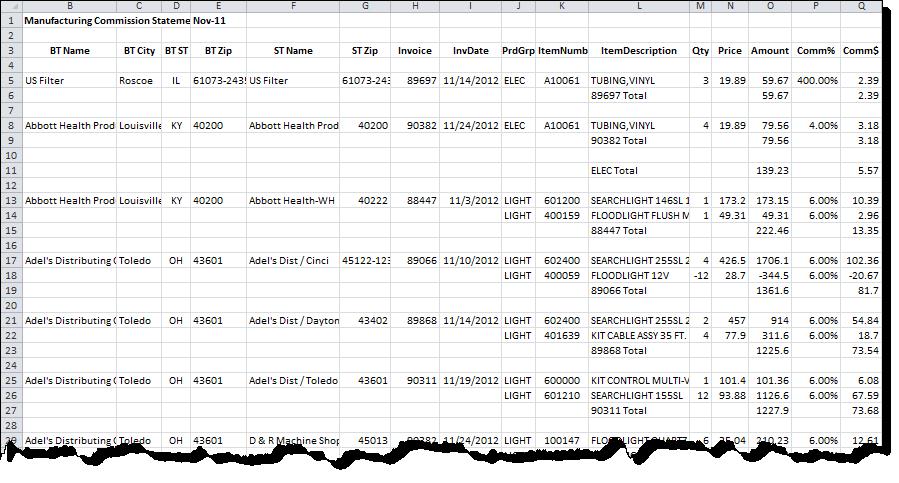
The spreadsheet example shown below is a primary example of where this can be used. Notice the first entry for each invoice has the permanent information but each subsequent row is left blank. By selecting the Auto Field Duplication option, the blank fields will be populated with the preceding data. This eliminates the need to manually modify the spreadsheet prior to processing it in dynaMACS.
 

Append Feature

With the Append feature you can combine two fields from your import file to map to a dynaMACS field. This is useful in identifying multiple Ship-to locations for a customer where the Ship-to location is in a different field from the Sold-to customer code. In the following example we will append the Code field with the Zip Code field.

  1. First highlight a field in box (2) Selected.
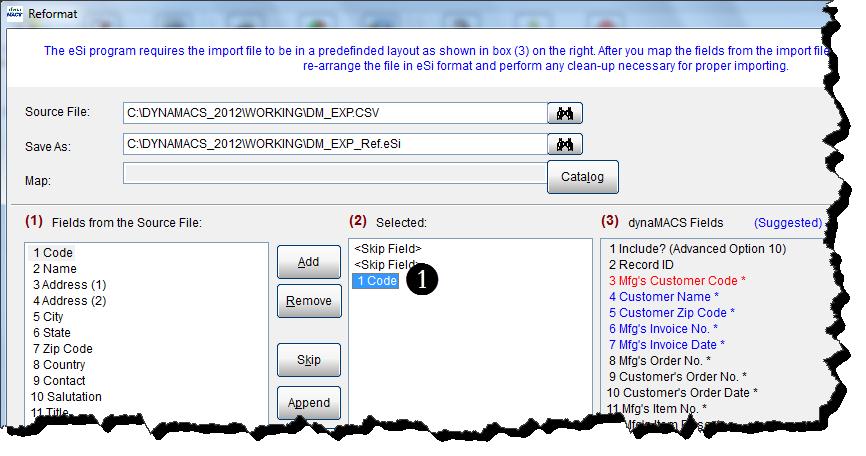
  2. Next highlight a field in box (1) Fields from the source file which will be appended to the field selected in step 1 and select the Append button.
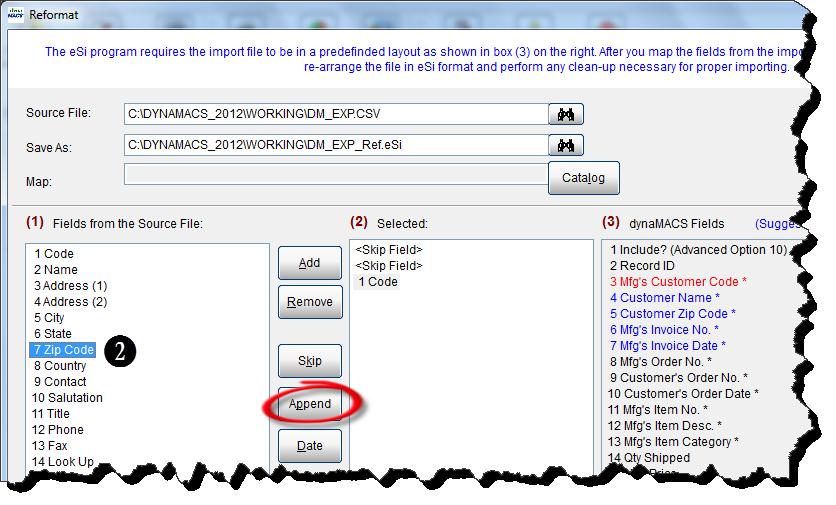
  3. The field Code is now appended with the field Zip Code. The combined field is “mapped” to the Mfg’s Customer Code used to identify the correct customer.Electronic Sales Information Mapping with the results of appending 2 fields together for the importing manufacturer commission statements into dynaMACS Software

If you are interested in the dynaMACS eSi module and you currently do not have access to it, please contact the dynaMACS sales office @ 800-321-1788 to learn more.
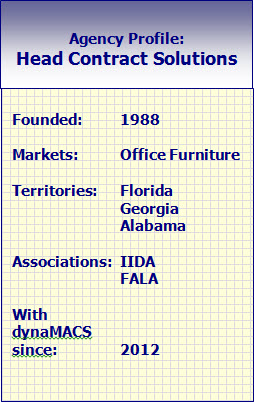
Case Study: Head Contract Solutions, Inc.

“We used our old software for a year and realized we had made a mistake. dynaMACS is much easier to use, and relevant information is easily accessible.”

Liz Head, Owner and Manager
Head Contract Solutions, LLC

Head_Contract_Solutions_LogoClient Challenge

Head Contract Solutions was expanding, hiring new sales reps, and trying to use Excel for sales and commission data. The agency needed deeper information than Excel could provide. So a hunt for new software commenced. Although hindsight is 20/20, the agency based its software decision mostly on price. It turned out to be a case of “you get you pay for.” Liz Head, owner and manager of Head Contract Solutions, described the software as “grueling.” It was not easy to learn or to use and the agency still wasn’t getting the in-depth data they sought. Using the software was making the agency less productive, instead of more.


Head_Contract_Solutions_StatisticsdynaMACS Solution

And so a second software search began. This time, Head Contract asked colleagues at other sales agencies what software they used. One name came up time and again: dynaMACS.

Head said what the agency saw in dynaMACS was, “a fast, flexible and reliable way to manage all of our sales and commission data.”

Head says dynaMACS makes it easier to pay sales reps, and she finds being able to access a 5-year sales history with a few mouse clicks extremely useful.

One of the biggest benefits for Head is the ability to import manufacturer sales and commission reports without manual entry. “We’ve pretty much eliminated data entry. We receive manufacturers’ sales invoices and commission statements electronically. It literally saves hours. For just one manufacturer a month, there are up to 400 lines items to cover each brand and every dealer. Before dynaMACS, stacks of paper would arrive and all the information had to be inputted by hand.”

Head says dynaMACS lives up to its reputation of a powerful performance analysis tool. “Our productivity and accuracy has grown exponentially, and we have only scratched the surface of what dynaMACS can do.”

Tip #1212 – Using Dropbox simplifies the process of sending and receiving dynaMACS Mobile update files

Dropbox helps you store files and access them any time wherever you are. Using Dropbox with dynaMACS will eliminate the need for sending and receiving your dynaMACS files via email. Dropbox creates a special folder on all your devices. Any time you need to save a file, drag it into the folder and at a blink of an eye it will appear in the same folder on all the other devices, be it laptops, PCs, mobile phones or tablets. For more information on obtaining a Dropbox account visit their website at www.dropbox.com.

Note

Setting up the dynaMACS Mobile Configuration for Dropbox Access

To save dynaMACS Mobile files to Dropbox you must set up each dynaMACS Mobile user configuration to save these files to a Dropbox folder.

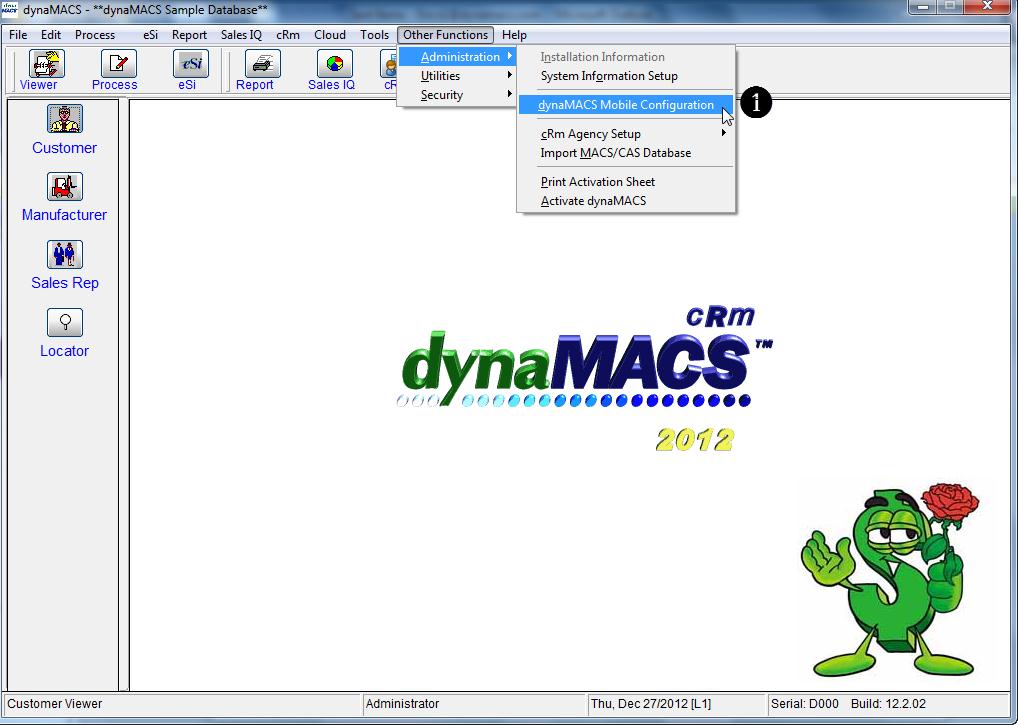
  1. From the main dynaMACS screen select Other Functions>Administration>dynaMACS Mobile Configuration to open the dynaMACS Mobile Configuration screen.dynaMACS Main Screen
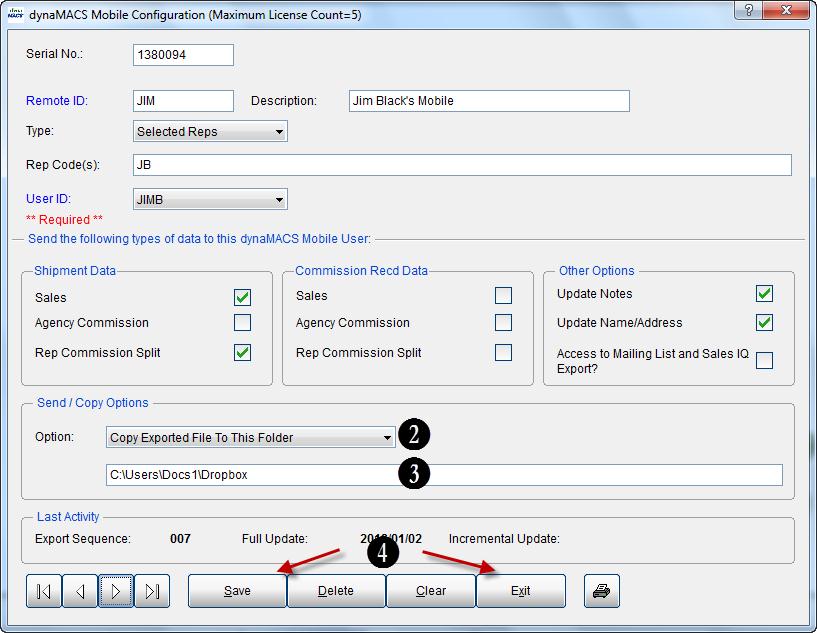
  2. With the configuration selected for the mobile user, select Copy Exported file To This Folder from the drop down box in Send/Copy Options
  3. Enter the path on your computer for the Dropbox Bin
  4. Select the Save button then the Exitbutton.Mobile Config

Accessing Agency Files from Dropbox

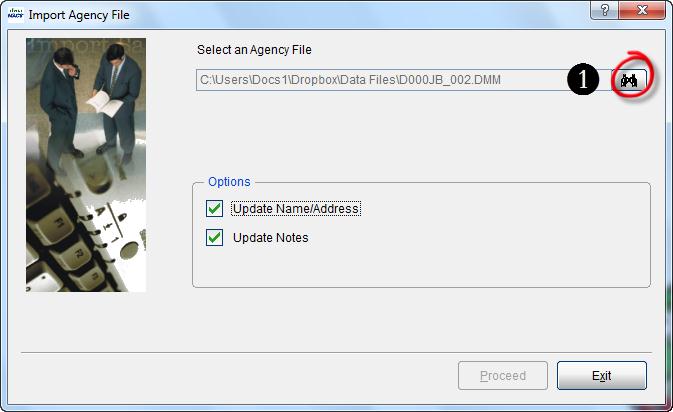
Since your agency file is sitting in a Dropbox folder, there is no longer a need to receive it via email and copy it to a folder on your computer before importing. You can go directly to the Dropbox folder during the Import Agency File process.

  1. From the Import Agency File screen select the Binoculars button to locate the agency (.DMF) file in the Dropbox folder and proceed with the import.Import Agency File


Tip #1211 – Using Data Field in Sales IQ to help analyze sales and commissions. . .

dynaMACS Sales IQ has a unique way of analyzing sales and commissions which allows you to change the data that is displayed in Sales IQ in order to view it several different ways. This tip will show you how to use this data field and also what data fields are displayed for each Data Type option.

Using the Data Type Field

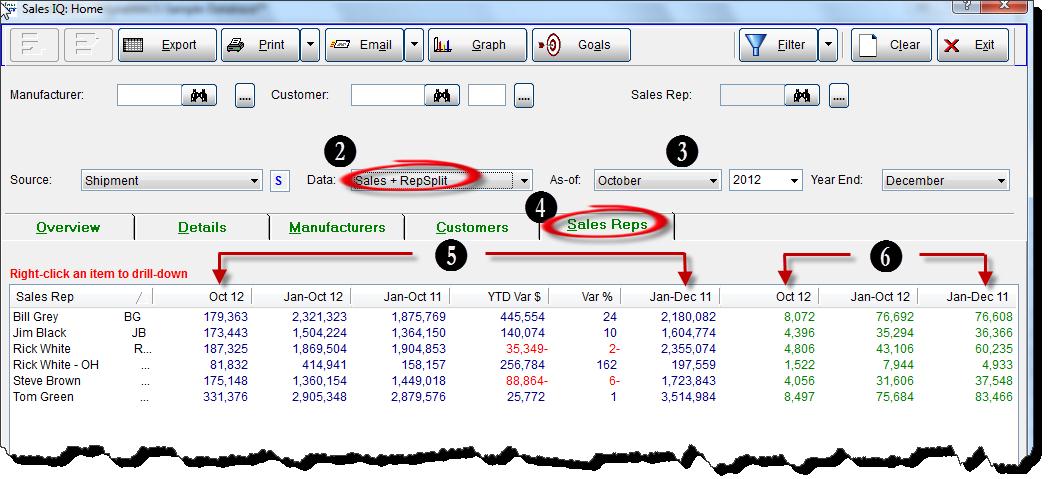
In the following example we show data for Sales and RepSplits listed by sales rep as of October 2012. This allows you to examine sales by each sales rep and what commissions have been paid to each sales rep.

  1. From the dynaMACS main screen, select the Sales IQ button.
  2. Select Sales + RepSplits from the Data drop box list.
  3. Select October from the As-of drop box list.
  4. Select the Sales Reps tab.
  5. >The columns in blue represent sales numbers for each sales rep.
  6. The columns in green represent commissions paid for each sales rep.SIQ Home

Data Type Descriptions

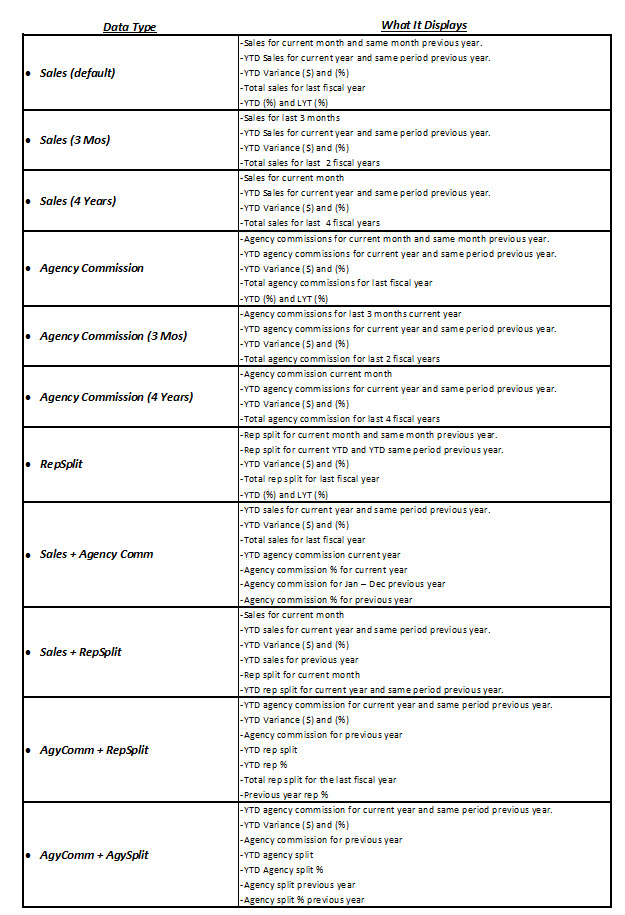
The following chart explains each Data type available and what will be displayed on the Sales IQ screen when selected.

Data_Spreadsheet

Case Study: Northcoast Sales Agency

“We have instant access to data from anywhere, on any device: laptop, iPad, smartphone. dynaMACS is unbelievably different from the old software.”

Jeff Van Winkle, Principal
Northcoast Sales Agency

Northcoast_Sales_Agency_LogoClient Challenge

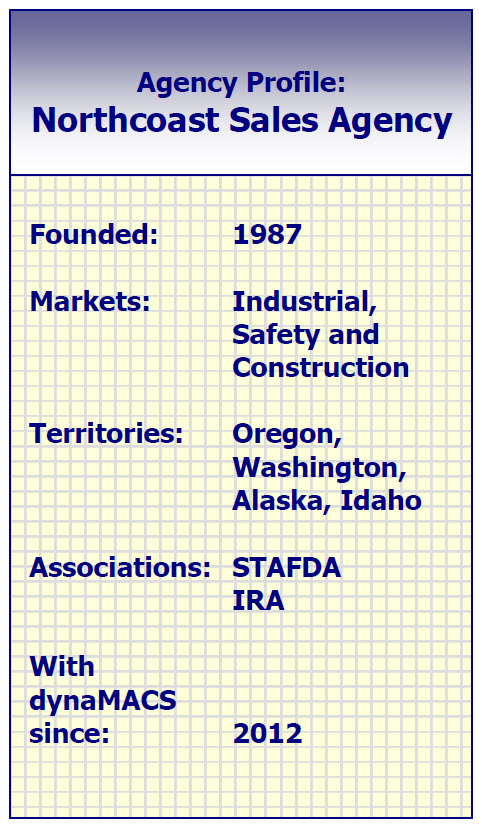
The search for new agency software came about for a simple reason: Northcoast Sales Agency needed better reporting. Sales reps needed up-to-date information that they could easily access while on the road. When talking to colleagues across the country about dynaMACS, Jeff Van Winkle, Principal for Northcoast Sales, says the feedback was extremely positive. So the agency switched from RPMS to dynaMACS.

Northcoast_Sales_Agency_StatisticsdynaMACS Solution

By making the change, the agency got much more than better reporting. Northcoast now has the latest, most advanced technology, with dynaMACS cloud processing and eSi electronic data transfer.

From the cloud, the entire team can now access real-time data from anywhere, anytime on smart devices. “We all have instant access to data from anywhere. I pull up reports on my iPad when I’m traveling, or from my computer at home. The access to real-time information is incredible.”

The entire team can review reports on customers, manufacturers and sales reps. Any time sales or commission information is updated at the agency, it is updated instantly on the cloud. All office locations and every sales rep can get real-time data at any given moment – no downloading of files or updates needed.

Another powerful dynaMACS’ feature that Northcoast selected is eSi. Commission reports and other sales data is received and updated electronically. Manual data entry of large reports from individual factories is a thing of the past. Reports are standardized across manufacturers and data is imported with a few mouse clicks in minutes.

Combining the speed of eSi and the anywhere-access of cloud processing, Northcoast Sales is equipped with the most efficient method for managing sales and commission data process, from receipt of raw commission statements through reporting and rep distribution.

Tip # 1210 – Using dynaMACS to Print Labels Directly to Microsoft Word

The dynaMACS Mailing List Export is a simple feature that allows you to print your mailing labels directly to Microsoft Word. This feature lets you target specific customers by filtering on data fields from the customer records in dynaMACS. You can also include or exclude customers that purchase from certain manufacturers.
The label option that will be used in the dynaMACS List Export feature must be set up first in your Microsoft Word program in order to use the dynaMACS Print Labels option. The following example explains how to set up the label options Microsoft Word.

Setting up Labels in Microsoft Word

In the following example we will set up the 5160DM in Microsoft Word. The 5160DM is equivalent in dimensions to the Avery 5160 label.

Note: There are 3 other custom labels available in dynaMACS:

          • CustomDM1
          • CustomDM2
          • CustomDM3

These labels can be created using the same procedures and applying the appropriate dimensions for the desired label.

Example

  1. With a new document open in Microsoft Word, select the Mailings tab.
  2. Select the Labels button.Main Screen
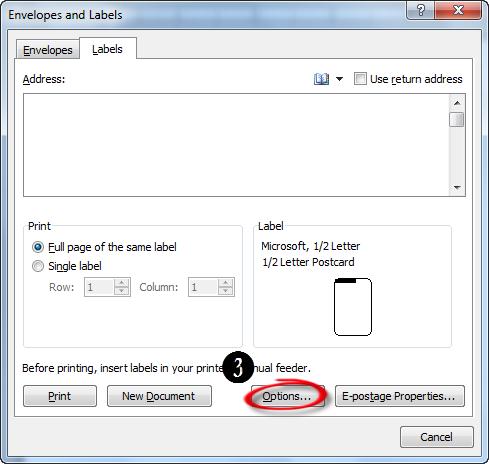
  3. Select the Options button from the Envelopes and Labels dialog box.Envelopes and Labels
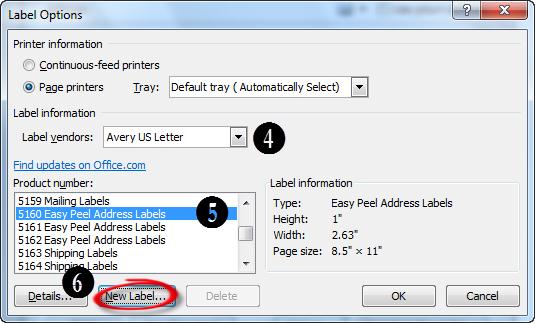
  4. From the Label Options dialog box select the option Avery US Letter from the Label Vendors drop down box.
  5. Select 5160 Easy Peel Address Labels from the Product Number list.
  6. Select the New Label button.Label Options
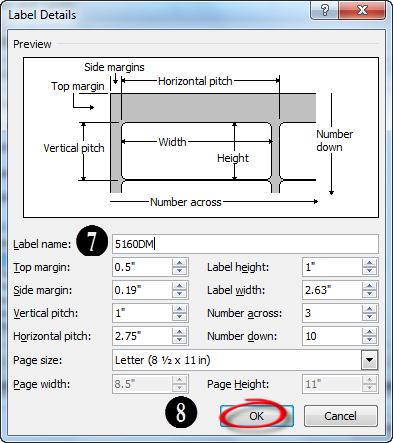
  7. Change the Label Name to 5160DM in the Label Details dialog box. You will notice that the dimensions for the Avery 5160 are displayed. This will allow you to create a new label using the same dimensions as the Avery 5160.
  8. Select the OK button.Label Details
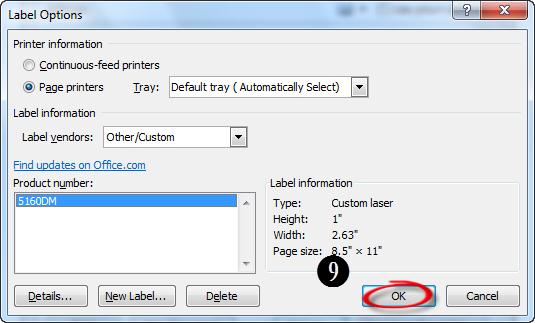
  9. From the Label Options dialog box select the OK button.  Note: You will see that the newly created label now appears in the list of Product NumbersLabel Options 2
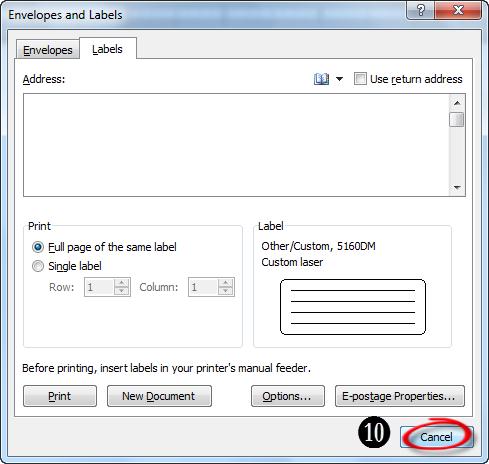
  10. Select the Cancel button from the Envelopes and Labels dialog box to complete the label setup and exit the Envelopes and Labels screen.Envelopes and Labels 2

Creating Labels from the Mailing List Export Screen

The following example explains how to select the mailing list options in dynaMACS and print labels once the label has been added in Microsoft Word.

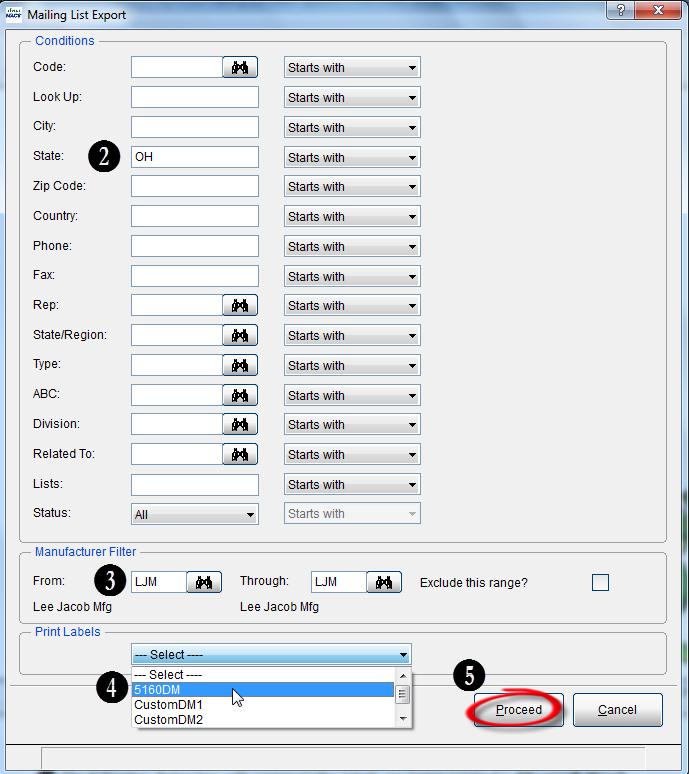
In the following example we will print labels using the label 5160DM for all customers in the state of OH and exclude the manufacturer Lee Jacob Mfg.

Example

  1. From the dynaMACS main screen select Tools>Mailing List ExportMain Screen 2
  2. In the Mailing List Export screen enter OH in the State field.
  3. Enter LJM in the From and Through fields in the Manufacturer Section.
  4. Select 5160DM from the Print Labels drop down box.
  5. Select the Proceed button.Mailing List Export
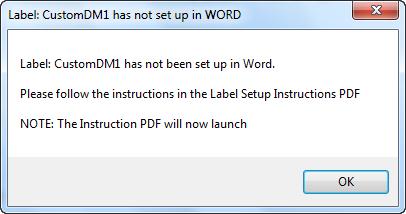
  6. The following dialog box will appear as the labels are being created in Microsoft Word.Creating Labels in MS Word Dialog BoxNote
    Error Msg - CustomDM1 Not Set Up
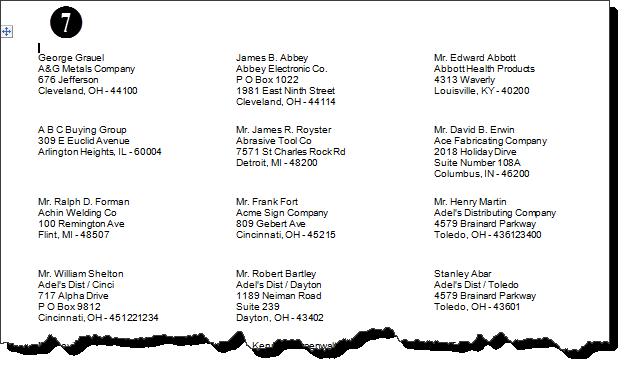
  7. Microsoft Word will launch with the labels displayed and ready for print.Screen Shot of Labels