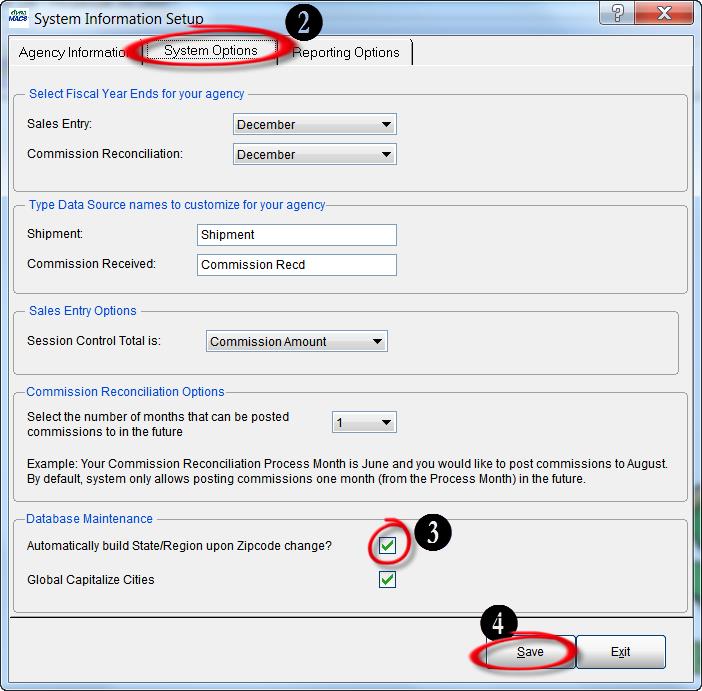
Tip #1407 – Evaluating True Agency Performance

Often times an agency picks up new lines and also loses lines.  When looking at sales numbers in Sales IQ, these numbers can often be distorted when you display both new manufacturers and lost manufacturers along with your active manufacturers.  The following examples will help you to identify your true sales numbers by excluding these manufacturers.  Also, modifying the manufacturers name with a symbol provides a quick visual when displaying all manufacturers in a list.

Classifying a Manufacturer Status

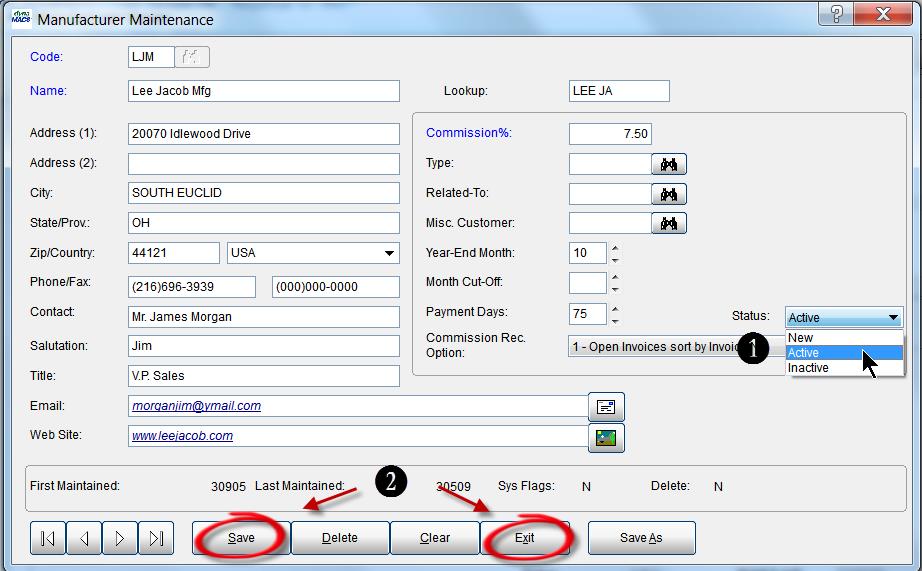
When adding a manufacturer the status is set to “New” by default.  Once a “New” manufacturer has met the agency’s requirements for categorizing the manufacturer as “Active”, the status should be updated.   Many agencies make this change after 1 year.  The following example shows how to change a manufacturer’s status.

  1. From the Manufacturer Maintenance screen, select Active from the drop down list in the Status field.
  2. Select the Save button and then the Exit button.Manufacturer Maint Screen

Adding a Symbol to the Manufacturer Name for an Easy Visual of New or Lost Lines

For a quick visual of “New” or “Lost” lines in your Sales IQ display list, you can modify the manufacturer name with a symbol that is easily identifiable such as “<-“ for a lost manufacturer or “<+” for a new manufacturer.   Once you change the status from “New” to “Active”, then you can remove the symbol from the manufacturer.

Note_Tip1407

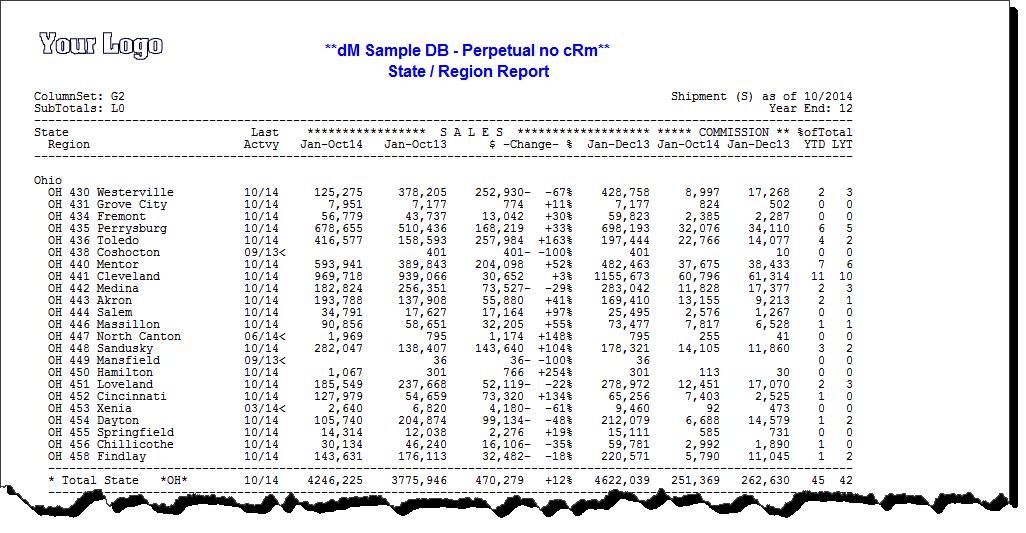
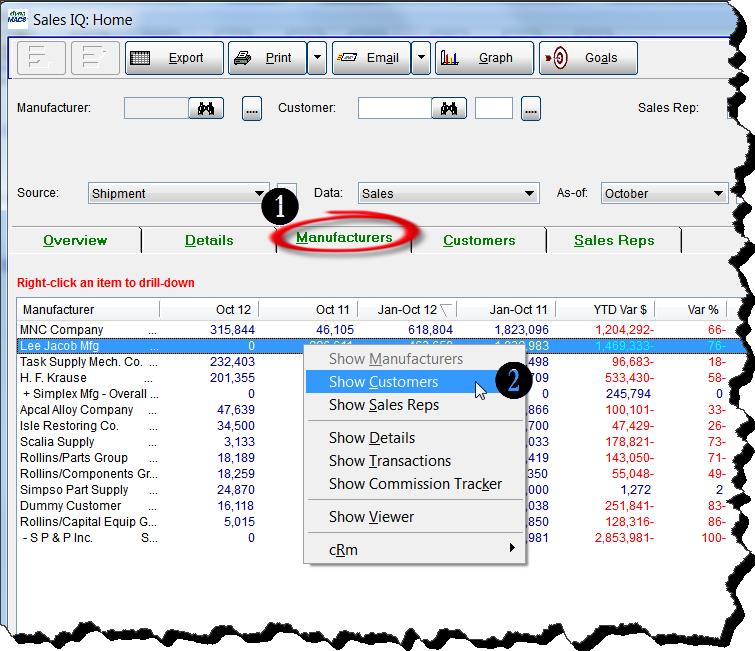
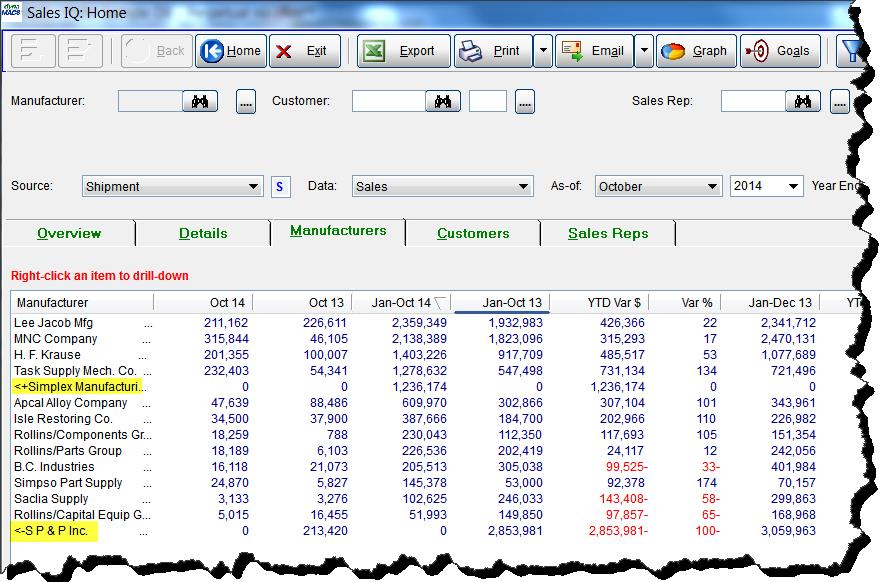
In the following example you can see the new manufacturer Simplex Manufacturing which has the “<+” in front of the name and you’ll see that there are sales in the column Jan-Oct14 but no sales in previous years.  You will also see the inactive manufacturer S P & P Inc. which has the “<-“ in front of the name and no sales in Oct 14 or this YTD Jan-Oct 14  but sales in previous years indicating a lost manufacturer.

Sales IQ Screen 1

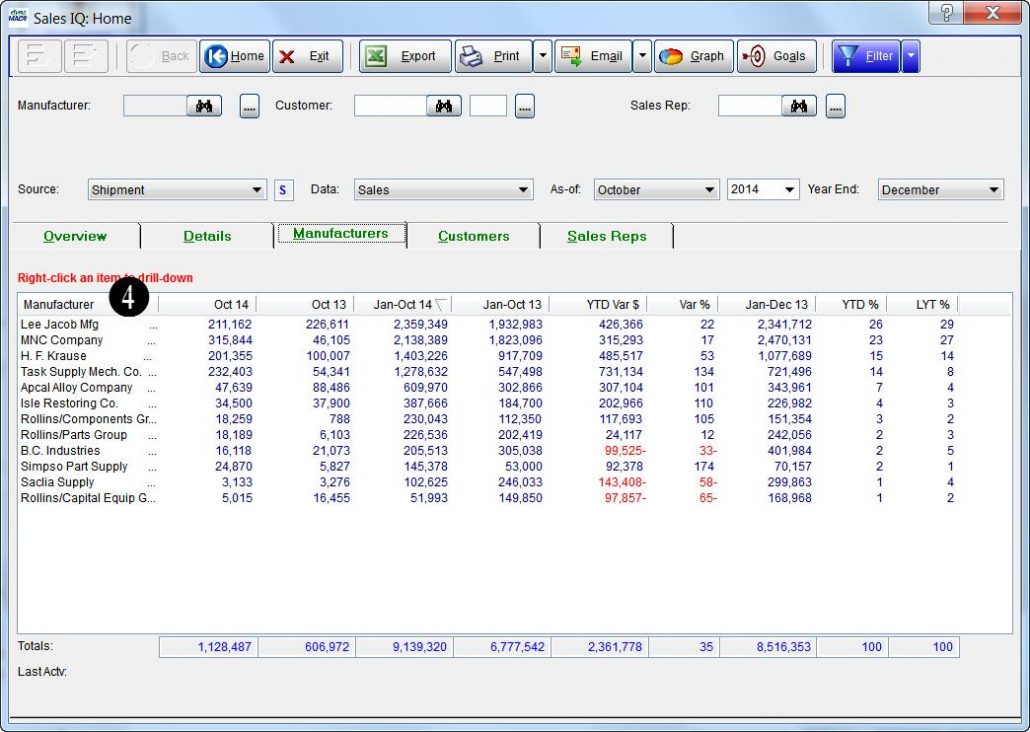
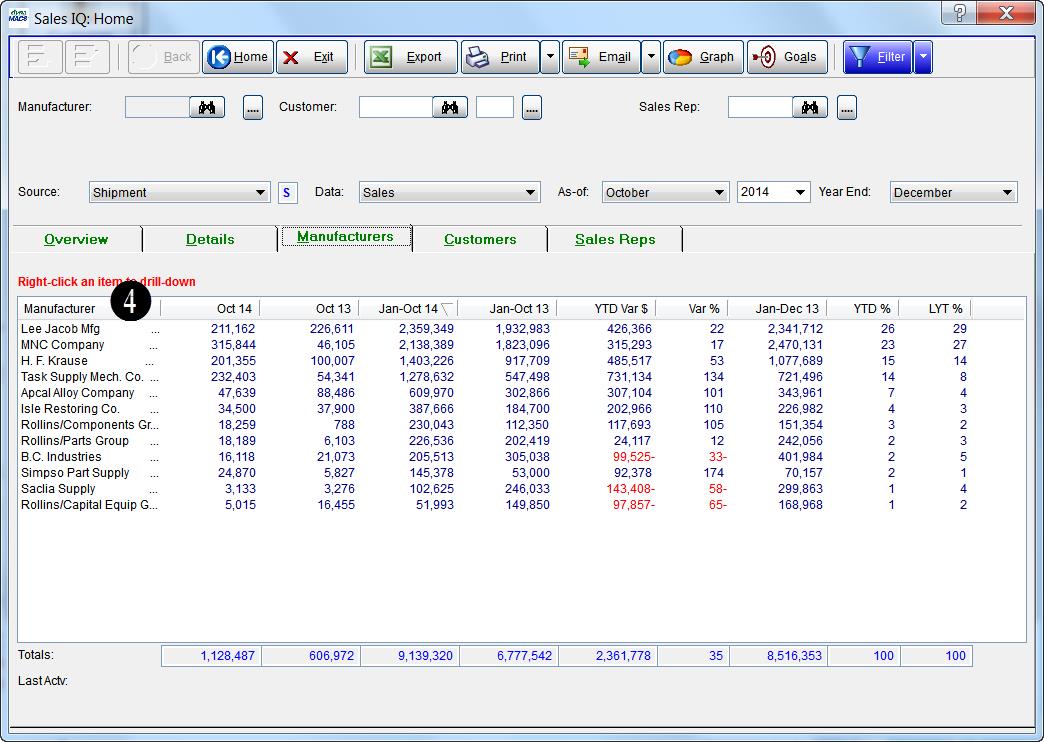
Excluding New and Inactive (lost) Manufacturers from the Sales IQ Display

You can remove “New” and “Inactive” manufacturers from the Sales IQ display by using the Filters button in Sales IQ.  This method will remove these sales numbers from the display showing you only the agency sales for “Active” manufacturers eliminating the new and lost lines.

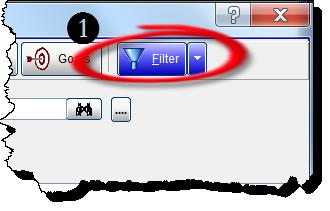
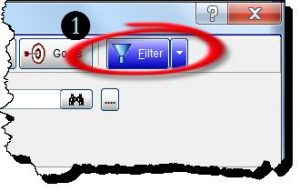
  1. Select the Filter button from the Sales IQ screen.Filters Screen 1
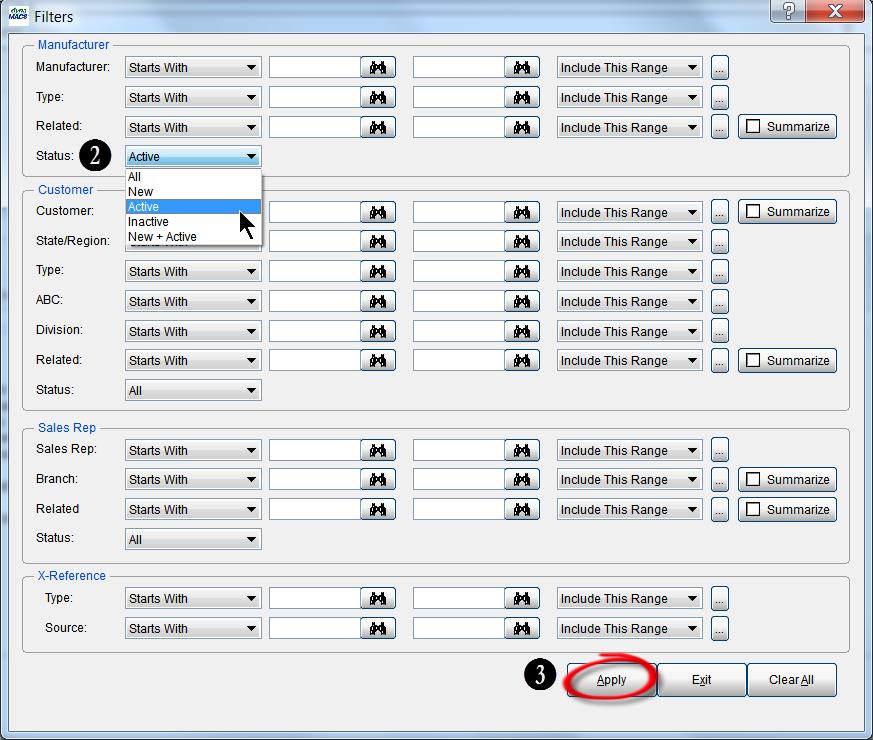
  2. From the Filters screen select Active from the Status drop down list under Manufacturer.
  3. Select the Apply button.Filters Screen 2
  4. After filtering you can see that only ”Active” manufacturers are displayed in the Sales IQ screen.Sales IQ Screen 2

Tip #1406 – dynaMACS Software Start Options

You can set your preferences in dynaMACS so that either the Sales IQ, Process, eSi or cRm screens open first upon launching dynaMACS.  You can also set preferences so that when your Sales IQ screen opens, the Source field defaults to Sales or Commission Received.  The following explains how to set these preferences.

Setting the dynaMACS Main Screen Focus

You can select what screen you would like to appear when first launching dynaMACS by selecting it in the Preferences screen.  In the following example we will change the start screen from the dynaMACS Home screen to the Sales IQ screen.

  1. From the main dynaMACS screen select File>Preferences.Main Screen
  2. From the User Preferences screen go to field 29 – Start screen.  Select the down arrow to the right under the Preference column.  This will display all of the start options available.  Select SalesIQ from the drop down list and select the Save button and then the Exit button.  The next time you log into dynaMACS you will be in the Sales IQ screen.User Pref Screen 1

Setting the Sales IQ Screen Source Default

You can choose to have the Sales IQ screen start with the Source field defaulted to Sales OR Commission Received by setting it in the Preferences screen.  In the following example we will change the preference to start Sales IQ with the source of Commission Recd.

  1. From the main dynaMACS screen select File>Preferences.Main Screen
  2. From the User Preferences screen go to field 28 – Start Sales IQ As:.  Select the down arrow to the right under the Preference column.  This will display all of the start options available.  Select Commission Recd from the drop down list and select the Save button and then the Exit button.  The next time you log into Sales IQ the source will be defaulted to Commission Recd.User Pref Screen 2

Tip #1405 – Maximize the dynaMACS State/Region Zip Code Feature

dynaMACS has a powerful feature that automatically populates the State/Region field based on the Zip Code entered when adding or updating customer records (provided a valid 5 digit zip code is used).  The use of the State/Region code is beneficial when generating reports in either Sales IQ or a Sales Analysis report.  The following instructions show you how to activate this feature.

***IMPORTANT!  PLEASE create a restore point before activating this feature and running the utilities!***

Example of a State/Region Report printed from Sales Analysis Rpt Generator:

Report Sample

Step 1:  Turn on the Auto Build State/Region Feature in System Information Setup

  1. From the dynaMACS main screen select Other Functions>Administration>System Information Setup.dynaMACS Main Screen 1
  2. Select the System Options tab.
  3. Check the box Automatically build State/Region upon Zip Code Change?
  4. Select the Save button.Sys Info Setup Screen

Step 2:  Run System Utility 1007 (Creates Customer State/Region codes table)

  1. From the dynaMACS main screen select Other Functions>Utilities>System UtilitiesdynaMACS Main Screen 3
  2. Select Utility #1007
  3. Select the Run buttonSys Utilities Screen 1
  4. Select the Yes button on the Confirmation dialog box.Confirmation Dialog Box  Delete Confirmation Box

Step 3:  Run System Utility 1008 (Replaces Customer State/Region codes in customer records)

  1. From the dynaMACS main screen select Other Functions>Utilities>System UtilitiesdynaMACS Main Screen 2
  2. Select Utility #1008
  3. Select the Run button to complete the update.Sys Utilities Screen 2

Tip #1404 – Using Sales IQ Filters in Versions 2013 and Above

The Sales IQ Filters screen has been redesigned to include or exclude “ranges” of selection criteria.  For example, instead of selecting one State/Region code you can now enter a range of State/Region codes to filter on and then include them or exclude them from the list.  The new features include:

  • Selection Criteria field with options Starts With, Contains, or Does Not Contain
  • Value fields to be used in conjunction with the Selection Criteria fields
  • Include or Exclude This Range field

Example:

In the following example we will filter all customers in the State/Region range of OH439 thru OH440.

  1. In the Customer section of the Filters screen select Starts With from the drop down box in the State/Region field.
  2. Enter OH439 in the lookup field directly to the right of Starts With.
  3. Enter OH440 in the lookup field directly to the left of Include/Exclude This Range.
  4. SelectInclude this Range from the range drop down box.
  5. Select the Apply Button.Filters Screen
  6. After selecting Apply, you will be returned to the Sales IQ screen and only customers in State/Region code range OH439 thru OH440 appear in the Customer list.
  7. To clear the filter select Normal Data from the Filter drop down list.SIQ Screen

Tip #1403 – Using Sales Entry Options to Customize Your Sales Entry Screen

To increase efficiency during sales entry, you can customize some settings temporarily for the current session or permanently for all sessions. You can even have different customized settings for each manufacturer.

Changing “Sales Entry Options” Default Settings

  1. From the dynaMACS main screen menu options select Process Sales Entry Options.DM Main Screen
  2. The Sales Entry Options window will open. Each customizable option correlates to a field on the Sales Entry screen.
  3. Select the applicable options from each drop down list and then choose the Apply button to apply these settings to the current session. Select the Save button to save these settings as the default settings for all future sessions.These default settings apply to all manufacturers without an established record in Sales Entry Options. See the next section in this document on Changing Sales Entry Options for a Manufacturer to customize sales entry for a manufacturer.Sales Entry Screen 1

Changing Sales Entry Options for a Manufacturer

The Sales Entry Options screen also allows you to create customized entry options for individual manufacturers by selecting a manufacturer, choosing the applicable options and then selecting the Save button.  Once you have sales entry options saved for a manufacturer, each time you enter sales for this manufacturer the Sales Entry screen will reflect the options chosen here for that manufacturer.

  1. From the Sales Entry Options screen select the Manufacturer radio button and enter the Manufacturer Code.
  2. Select the applicable options from each drop down list and then choose the Save button. These options will be saved for all Sales Entry sessions for that manufacturer.Sales Entry Screen 2

Field Descriptions and Available Options for Customizing Sales Entry fields:

Set Focus to Mfg After Save – Selecting Yes will save the settings so that after saving an entry the Mfg code is saved for the next sales entry.  Selecting No will leave the Mfg field blank for the next sales entry.

Customer – Allows you to select the customer using Customer Code, Manufacturer/Customer Code or Manufacturer Related code.  This is useful when you are entering from a sales report or commission statement that has the manufacturer’s customer code.

Sales Rep – By selecting Enter the cursor will STOP at the first Sales Rep field (primary).  By selecting Skip the cursor will SKIP the first Sales Rep field primary.

Sales Rep (%) – Commission split percentage for the primary sales rep.

  • Enter (default) – Allows operator to enter an override for the rep split.
  • Skip – Bypass this field.

Multiple Sales Rep % – Allows entry of second and third sales reps and their commission split percentages.  Note:  Rep (%) must be active.

  • Enter (default) – Sets the fields as active; however, the cursor skips over these fields to minimize keystrokes during entry.  You can use the Shift-Tab keys to go back and change these fields.
  • Skip – Bypass this field.

P.O. No. – Allows entry of the Purchase Order number.

  • Enter – The cursor stops at this field for entry of each purchase order number.
  • Skip (default) – bypass this field.

Invoice No. – Allows entry of the invoice number.

  • Enter (default) – Cursor appears in this field for entry of each invoice number.
  • Skip – Bypass this field.

Invoice Date – Allows entry of the invoice date.

  • Enter (default) – The cursor stops at this field for each invoice.
  • Skip – The field stays active but the cursor does not stop at this field.  You can use the mouse or the Shift-Tab keys to go back and change the invoice date.

Post Month – Sets the month/year for posting of the sales entry.  (Field is always active but the cursor does not stop at this field to minimize keystrokes.  You can use the Shift-Tab keys or the mouse to go back and change it.  If you change this field, it changes back to the original setting after the current entry is saved.)

  • InvMth (default) – Uses the month and year from the invoice date as Post Month.  This is the default setting for dynaMACS.
  • PrMth – Uses the Process Month as the Post Month.  The Process Month is in the yellow box under the Options toolbar on the Sales Entry screen.  If this month and year is not correct, cancel the session and start over.

Non-Comm/Total $ – Allows entering non-commissionable amount to calculate the total for the entry.

  • Enter (default) – Cursor stops in this field after entering Sales ($) amount to enter freight or discounts.
  • Skip – bypass this field.

Commission – Activates the field for entering commission by amount of percentage.

  • Comm$ (default) – Activates the Commission$ field to enter a commission amount.
  • Comm% – Activates the Comm% field to enter a commission percentage.

Tip #1402 – Using Sales IQ to Identify New Customers for a Manufacturer

Sales IQ has a unique feature that will allow you to identify new customers by identifying those that had no sales activity in the previous year but have purchased in the current year.  This can be accomplished by using Display New Sales YTD or MTD.

To Identify This Year’s New Customers for a Manufacturer:

  1. From the Sales IQ screen select the Manufacturer tab.
  2. Right click on a manufacturer and select Show Customers. Sales IQ Home
  3. Select This YTD from the Display New Sales drop down list.
  4. Select the Refresh button.Sales IQ Home 2
  5. You will notice that the list has been filtered to display only customers with YTD sales that had NO sales in the previous year for this manufacturer.Sales IQ Home 3